Once you’ve mastered hosting a basic meeting, you can start adding in more skills, like spotlighting, breakout rooms, co-hosts, polling, and captions.
Spotlighting
In gallery view, you can see as many people as fit on your screen. The person who is talking has a yellow box around them. In speaker view, the screen shows one big image of whoever is talking now. But sometimes when someone coughs or laughs loudly, the speaker view will jump to them, and the jumps between people can get disorienting. Sometimes, you want to keep the spotlight on a speaker even if other people are making noise or talking briefly. (This may be especially important if you are recording the meeting for later use – I teach children so I always have the teacher spotlighted, even when children are speaking so that the recording that I share later doesn’t capture any of the children’s images. To spotlight someone’s camera, go to the participants list, mouse over their name, and where it says more, choose “spotlight”. OR go to their picture and click on the three dots at the top right corner and choose spotlight.
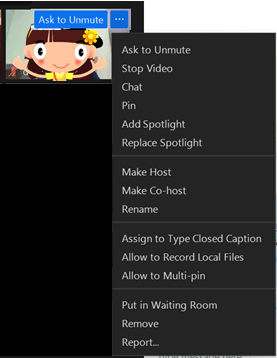
You can also spotlight multiple people at once – I’ve used this for puppet shows, where you want to see both speakers at once, or for role plays with multiple participants. Spotlight one, then go to the next person and choose “add spotlight.” There’s also “replace spotlight” if you want to take it off one person to put it on another.
Pinning
You’ll also see the option to “pin” a video of a participant. Any participant can pin someone, and it just pins that person into their main speaker view no matter who is talking. Pinning only affects THEIR own personal view of the screen, no one else’s. When the host spotlights, it affects what everyone sees.
Arranging the Gallery
You can arrange where people’s camera images appear on your screen. Just click on their image and drag them where you want them. I use this for things like remembering what order people will take turns in, or who has already spoken. I can do that just for my own view – no one else sees my order, or as host, once I’ve arranged everyone, I can choose to share that with all my participants by choosing “follow host’s video order” in the view menu. That can be helpful if you want everyone to be able to see what order people will take turns in.

Breakout Rooms
In a large meeting, you can create smaller “breakout rooms” which are Zoom meetings nested inside the main meeting. Just go to your command bar at the bottom of the screen, and choose the breakout rooms icon – the square with the grid on it.

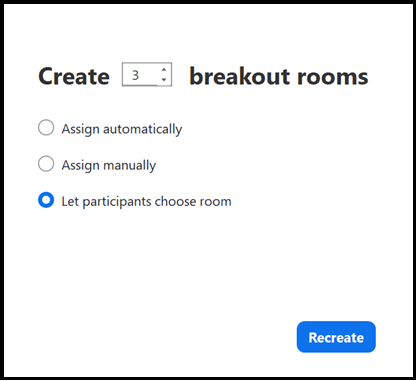
It will pop up a window where you can decide how many rooms to set up, and whether to randomly assign people, manually assign, or let participants choose their own room.
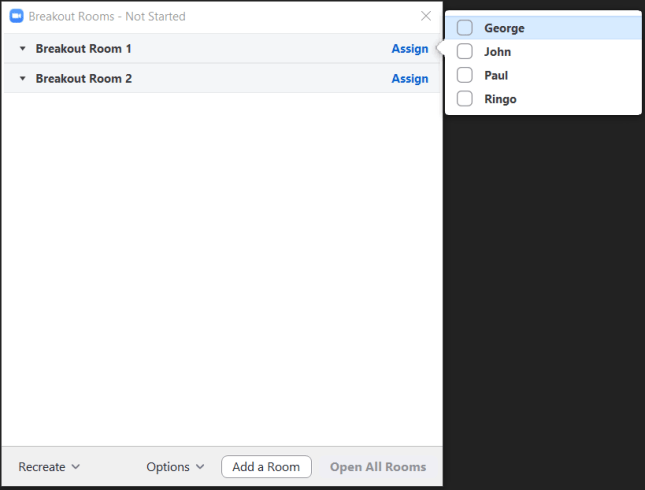
If you choose to let participants choose room or to manually assign, then it will go to this window. You can rename the rooms – mouse over them and you’ll see the option to rename. (Note: this if fussy – if you don’t see the option, then mouse over breakout room 2, then move UP to room 1 and the rename option will appear.) To assign participants, you’ll click on “assign” and it will pull up a list of participants to choose from.
If you choose automatically assign, it will divide them up at random (if you have 12 people and 3 rooms, it will randomly put 4 people in each room) and display a similar window. In that window, you’ll be able to click on any participant and “move” them to another room or “exchange” them with someone in another room to finesse things if you want.
Check your other options here to be sure you have them set the way you want to. I rarely have them close automatically, because you can’t make any adjustments in that plan after the breakouts start – it will just force a close. That first option – “move all participants into rooms automatically” – I use when working with children because it’s easier, But I usually unclick it for adults so they get more of a sense of being able to choose when / whether to go to the breakout room.

If you’re ready, you can now “open all rooms” or you can close this window for now (by clicking on the x at the top) and wait till you’re ready.
When you’re ready, “open all rooms”, and each participant will get an invitation to join a breakout room. When you’re ready, close the breakout rooms, and they’ll all return to the main meeting. When breakouts are in session, you as the host can move between them at will. Just click on the breakout room icon, and choose which one you want, and click “join.”
Choose Your Own Breakout Room
After you open the breakout rooms, participants on a laptop or desktop can go down to the command bar at the bottom of the screen. They may see the breakout room icon (four squares) or may see “more.” Click on that, then choose breakout rooms.

For participants on a mobile device, if they tap their screen, they’ll see the breakout rooms icon up on the top left.

When they click on the breakout rooms icon, they’ll be given a choice of rooms. They click on one and choose join. (Note, on a desktop, next to the room name, it MAY say “join” in blue or it may have a blue number showing how many people are already in the room. Just click on that to join. They can also see which participants are already in the room they plan to join.) On a phone, they’ll see the list of rooms and can click on the one they want, then click join,

Once the participant is in any room, they can use the breakout room icon to navigate and hop between rooms. When they’re ready to leave the breakout rooms and return to the main room, they just click on “leave room.” (Bottom right on a computer, top right on a mobile device.)
Co-Hosts
If you’re running a complex meeting, you may want to have an extra person (or people) serve as a tech assistant. I have worked many church services where we have: a moderator who spotlights and mutes people, a projectionist who handles sharing PowerPoints and videos, someone to lead music, and an usher who lets people in from the waiting room and monitors the chat.
To make someone a co-host, during the meeting, mouse over their name in the participant list, choose more, and make them a co-host. OR go to their picture and click on the three dots in the top right corner. Co-hosts can do all the host tasks, except the host can manage the breakout rooms more effectively.
Scripts. If you’ve got this complex multi-host meeting going on, it’s REALLY helpful to have a shared script, which may be ALL the words written out, or it may just have the cues for how one person will end their segment and who they’ll hand off to next. We do a shared script on google drive so we can all edit our own parts, but we’re using the same shared document, and we color code for each person’s role.
Understanding the participant list
Sometimes in a large meeting, it’s hard to find who you’re looking for in the participant list. FYI, here’s how the list is generally sorted. You’re always at the top of your own list. After that, it’s host first, co-hosts who are unmuted come next, in alphabetical order. Then co-hosts who are muted, A – Z, then participants who “have their hands” raised A-Z, then participants who are unmuted A-Z, then participants who are muted, A-Z. But that means when someone un-mutes themselves or raises or lowers their hands, they move around in the list. If I’m running a big 100+ person meeting, and I have four or five speakers I’ll need to be able to find and spotlight during the meeting, I either make them co-hosts, or I have them rename themselves with an asterisk in front of their name. That moves them to the top of an alphabetical list.
Claim Host
Sometimes you may be asked to serve as a host for a meeting someone else set up. If they have the meeting set up as “enable join before host”, then you (and everyone else) can just jump into the meeting at any time. You can do most of what you need just as a participant. But if you need to share screens (and that’s not enabled) or you need to set up breakout rooms, you can “claim host” IF they have given you the six digit code to do so. In the meeting, you would go to the participant list, click on the three dots at the bottom. Choose Claim Host, and type in the host key.
Polling
You can run single votes or multiple choice polls during a meeting. You can use these for actual business, like taking a vote (you can also use reactions icons for votes), or you could use them as agenda setting where you asked people to mark their highest priority topics for a discussion. Or you can also use them for fun – with silly polls as icebreakers.
When you schedule a meeting, on the meeting management page, scroll to the bottom of that meeting to find the poll option and click “add” to begin creating the poll. (If you don’t see the polling option, you’ll need to make sure you have polling enabled for your account. Learn how.) Enter your title, questions, and answers. Save for later. (Note: you can also create polls during a meeting, just by clicking on polls on your command bar, but I prefer to create mine in advance.)
During the meeting: Click on “polls” in the command bar, select the poll you want, and click launch poll – it will pop up on all your participants’ screens. As they enter their responses, the host and co-hosts will be able to see them live. When you want to stop, choose End Poll. Then, if you want to, you can click on “share results” and your participants will see the results. (Learn more about Zoom polling.)
Captioning – Live Transcript
You can assign someone to create closed captions.
Or, you can use automated closed captioning, called live transcript. As participants speak, it will automatically create captions. Word recognition is NOT perfect (especially if the speaker does not have a northern United States accent) and it will make mistakes! Some are confusing, some are entertaining, some are awkward. They also don’t handle sung words well. But, captioning does increase accessibility of your meetings for people with hearing impairments, difficulties with auditory processing, or non-native speakers.
Before a meeting, check your settings to be sure this option is enabled. Go to your account at zoom.us, go into your settings, find the closed caption option, and turn it on, plus check the box to enable live transcription.

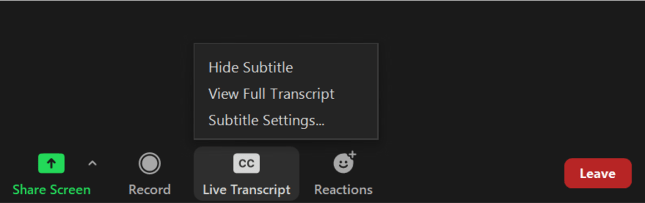
To start captioning: in the command bar, click on the CC logo for live transcript. Then choose “enable auto-transcription” and they will start.

Participants may automatically see them, which is helpful for some and distracting for many. Or they might NOT see them. So, it’s helpful to teach your participants how to turn them on and off. On a computer, go to the command bar, click on CC logo, choose either show subtitle or hide subtitle.
On a mobile device, go to more, then to meeting settings, then turn on closed-captioning. To make the captions larger, adjust your accessibility settings. (Learn how.)

Learn More
To learn how to use Zoom, or to help your group members learn how to use Zoom, check out the other articles in my Zoom Guide. Here’s some to start:
- Sharing Screens on Zoom (how to share PowerPoint slides, videos, documents, the whiteboard, etc.)
- Optimizing PowerPoint for use on Zoom
- Games and Interaction on Zoom – lots of ideas from charades to Pictionary to polls and quizzes and skribbl.io
- Music on Zoom: playing recordings, live music or leading songs
Updated 6/23/21
