If you’re hosting an event that’s open to the public, you don’t want to make it too easy for a zoom bomber to crash the meeting. But, you don’t want to make it too hard for potential attendees you want to reach. Posting the meeting link on the internet for anyone to find and jump into your meeting is too risky. A reasonable compromise is to require registration, and put up a link on the internet where people have to register in advance for the meeting. Zoom bombers are less likely to want to jump through this hoop. Also, to register, they will need to enter a valid email address, which is another disincentive. And that email address is a marketing advantage to you. It means your event gathers contact information that you can use later to follow up with attendees with more info about your services.
Here’s how to set up registration:
Go to https://zoom.us. Sign in to your account. Choose schedule a meeting.
Enter title, description (the blurb), and time/date info, then mark the box that says “registration – required.”
For meeting ID, generate one automatically (you don’t want to advertise your personal meeting ID broadly). Require a passcode, and turn on the waiting room. (Learn more about these and other security measures.)
Check your other settings to see if they’re the way you want them to be. If I’m having a meeting where I want people to interact, I like having participants come in camera on – they’re more likely to stay camera on and we have a social and engaging meeting. (And they can always choose to turn it off.) If they come in camera off, it’s REALLY hard to get people to turn them on. But I do mute participants on entry because background noise can be disruptive. If I’m teaching children (or working with non tech savvy elders), I mark that I want to be able to request permission to unmute participants in case they can’t unmute themselves.
Now choose save.
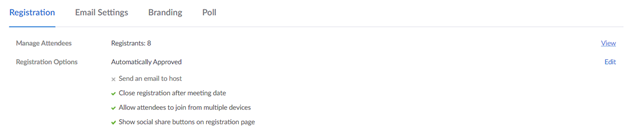
Then, you’ll see the meeting info. At the bottom of the meeting info, you’ll see something that says registration.
Under the registration tab, choose edit (blue word off to the right)
That takes you to a menu:

You could choose manually approve. They do not get an email confirmation or a link until you approve them. This increases security, but I found that was too much work for my purposes. Plus, when people registered at the last minute, as I was starting a class, I didn’t see any of those registrations come in, so I didn’t approve them and they weren’t able to participate. So, I choose automatically approve, and they get the link as soon as they register.
You can choose to get an email every time someone registers, but if you’re running a large event, you probably don’t want that many emails! (Now, if I were wanting to make sure I’d meant a minimum number of participants, I might initially set this so I got emails that made it easy for me to track it, and then later on, I can go back in and change that setting.)
Now go to the questions tab – it always asks first name and email address and that’s all I need for my purposes, but you may want more. Under the “custom questions” tab, for kids’ classes, I add a question about their child’s age. Now save those registration options, and it takes you back out to the registration tab.
Then, under email settings tab, where it says confirmation email, you can send yourself a copy and make sure it looks good. You can choose to edit it, but basically it gives you one small text box where you can type in your personal note. The rest is pretty boilerplate.

Under branding tab, you can add a banner and a logo.
After you’ve done these parts, scroll back up in your meeting info and copy the registration link.
Go to that link – make sure the registration looks like what you want parents to see. If not, go back and edit as needed.
Now you can share the invitation or send the registration link to anyone you’re hoping will register for your event!
Note: You can add people to the registration yourself. (For example, if someone called in to register, you could go to the form and sign them up.) This works easily – but does require that you have the email address that they use to sign in to Zoom, so when they go to zoom, it recognizes them.
Some additional Zoom Guides you may find helpful:
- Hosting a Meeting (starting a meeting, inviting people, scheduling a meeting, security issues, muting, the basics of recording and sharing screens)
- Advanced Meeting Management (spotlight, breakout rooms, co-hosts, polling)
Updated 6/23/21
